
This is a basic guide to understanding and installing above grade floor drains and trench drains. This installation guide is not intended to be an all inclusive manual or to handle every installation situation that may arise. This guide discusses the common types of products, installation methods, and design parameters required for successful drain installations in elevated deck applications. These principles apply to both floor drains and trench drains. If the actual installation details vary from the enclosed information please contact the Eric’sons Dura Trench engineering department for additional advice.
Drains on Elevated Decks
Background
Drains that are placed in elevated slabs are known to be problematic and often leak to the floors below. This is due in large part to the wrong drains being installed, lack of critical design details, poor understanding of how to construct these drains, and lack of attention to detail during installation. Eric’sons engineers and installation crews have been involved in fixing literally thousands of leaking drains that were improperly installed in elevated decks. The methods in this booklet are proven, simple steps that can help eliminate leaking elevated deck drains.
Anatomy and Types of Elevated Deck Drains
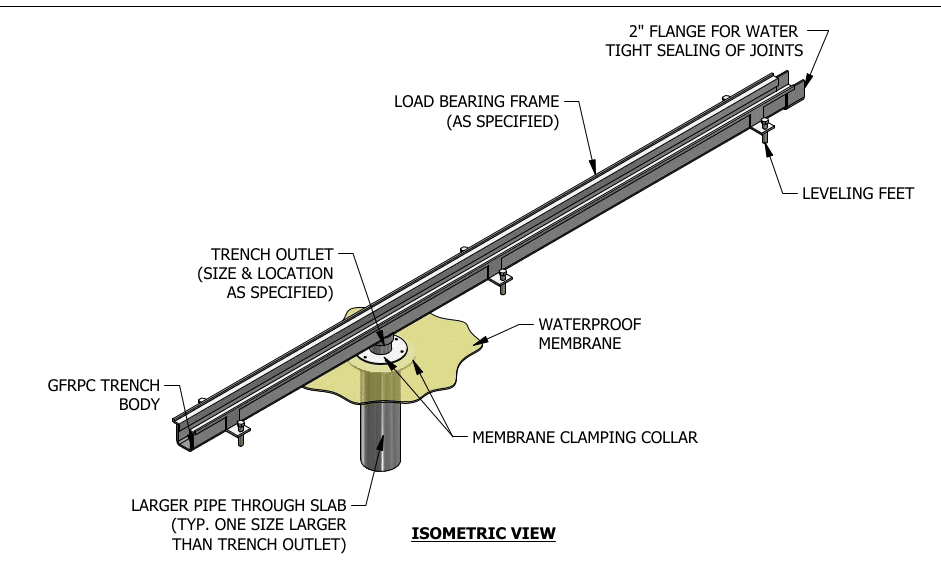
Trench Drain with Outlet Clamping Collar
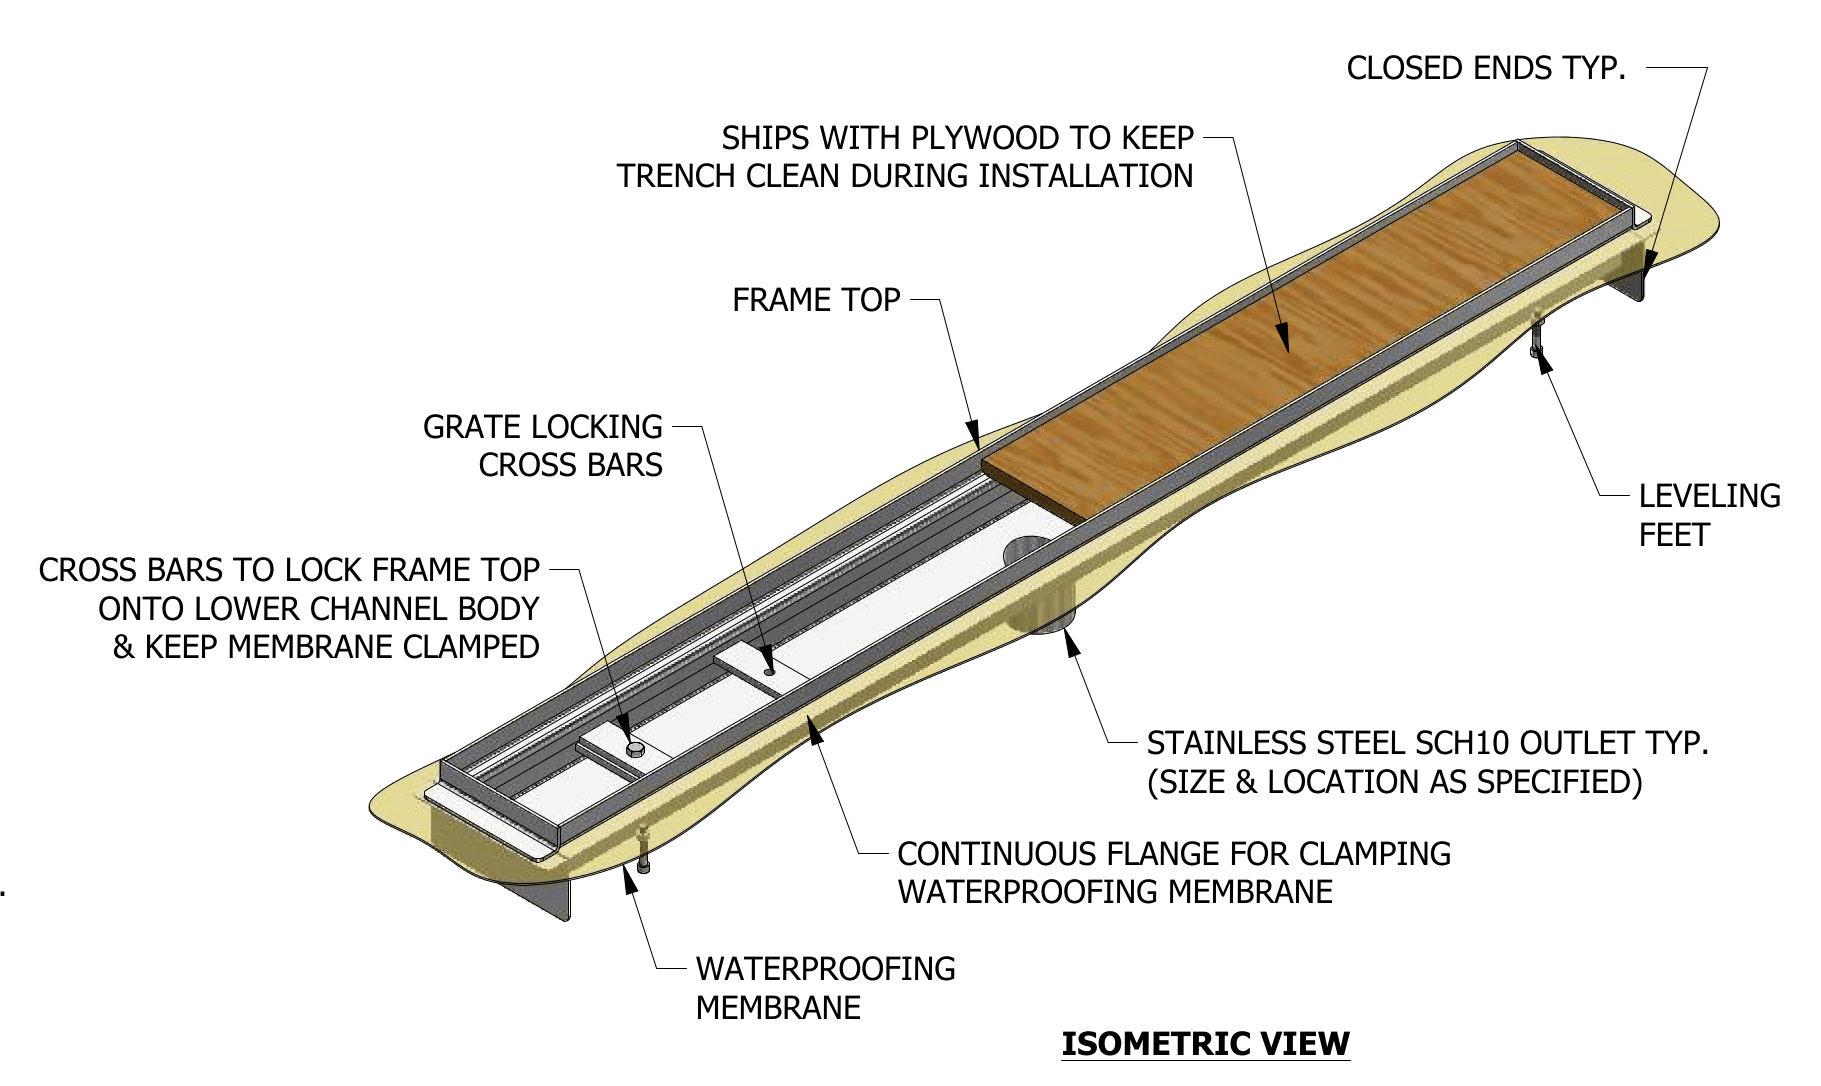
Trench Drain with Full Length Clamping Collar
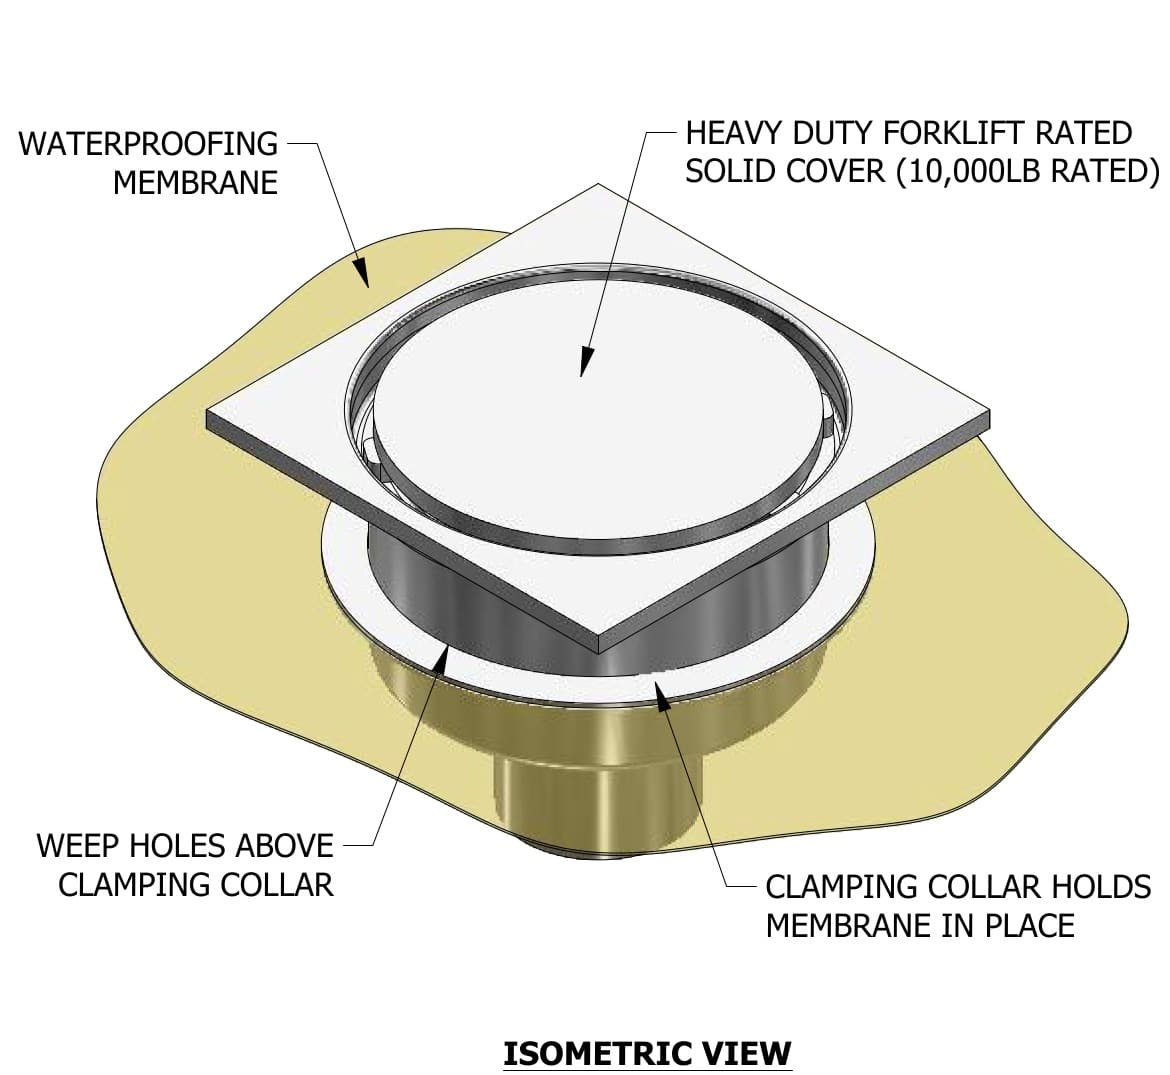
Flood Drain with Clamping Collar
Design Method 1: Composite Slab
Construction of elevated decks with composite slabs have multi-layer protection and are the most effective at eliminating leaks to the floors below. This type of construction consists of a structural slab that is poured first. Next a waterproofing membrane is installed. In some cases a capillary layer is installed. Then finally a topping slab is poured over this waterproofing system to protect it from normal traffic and wear. The trapped waterproof system stops penetration of water that may weep through porous concrete, cracks, voids, etc. The membrane must have a place to release the water or the slab. In areas that will receive a lot of water and where the topping slab is not sealed with additional toppings, an intermediate capillary layer is installed to allow water to travel horizontally under the slab to drains that allow this membrane to weep. This composite slab system can take years of service with little risk of leaking to areas below.
To properly install a drain in this type of construction there are several considerations. The first is that the type of drain installed must have a membrane clamping collar. This clamping collar must be installed at the same height as the waterproofing membrane to be effective. The drain should also allow water to weep into the drain above the waterproofing membrane to eliminate water pressure on the waterproofing membrane. If the area will be a wet area, it is best to place a small amount of gravel around these weep holes. This will ensure that the weep holes are not plugged during concrete placement.
Drains in this type of installation should be set in the structural slab and cast into that slab. It is also possible to have the drain installed completely above the structural slab with the Dura Trench clamping collar assembly installed in the structural slab below. This assembly improves the success of the waterproofing application and reduces installer skill and attention to detail.
With the top of the clamping collar set at finish grade of the structural slab, the waterproofing membrane is then installed on top of the structural slab. The waterproofing membrane should continue over the clamping collar of the drain. For liquid applied waterproofing, the clamping collar is removed and the flange is simply coated.
If sheet waterproofing is used, the sheet material is carefully cut around the drain and the collar is used to clamp the membrane in place so that it stays connected to the drain during the topping slab placement. When sheet waterproofing is used we recommend that the drain body is also sealed under the clamping collar with a swell stop material such as Cetco RX101 (or equal).
This bentonite swell stop material that is applied below the clamping collar will swell to fill any void if water comes in contact with the material. This will cause the water to back up and weep into the holes above. The swell stop should be attached to the drain body with the manufacturer recommended adhesive about 1/2” to 1” below the clamping collar. Note that this material is best placed close to the center of the structural slab as the swelling of the material can cause a blow out of the concrete if placed too close to the bottom of the slab.
Design Method 2A: Simple Slab New Construction
A simple elevated slab has only a single layer of concrete with no waterproofing membrane. We do not recommend this type of construction for wet environments but we do often see this type of construction used by design firms to reduce building construction costs. This type of construction can be problematic for wet areas but it is possible to achieve a dry environment below if properly constructed. This type of construction uses a drain with weep holes and a waterproofing collar. In many cases, the top of the slab is treated with a waterproofing material such as a resinous flooring system to stop the migration of water through cracks and porous concrete.For this type of construction, the drain is placed in the slab pour and the drain will have a waterproofing collar that is roughly at mid depth of the slab. A swell stop material (similar to Cetco RX101) is placed just below the waterproofing collar to stop water migration around the perimeter of the drain. Note that care should be taken to ensure this swell stop is not close to the bottom of the slab as the swelling pressure of the concrete can cause the concrete to spall out due to internal tensile forces of the bentonite swelling when it makes contact with water.
Concrete is porous, will expand and contract, and crack. All of these will allow water through the slab. To prevent this, proper treatment of the slab above is a must. Ideally penetrations in the slab should be at high points in the slab to minimize water in those locations. If that is not possible, it is a good idea to have a waterproofing flange and swell stop material applied so that the cracks will not leak. Finally, the slab must be sealed at all points. All joints that move must be treated with a sealant and the slab itself must be waterproofed. These techniques are out of the scope of this document but must be considered for an effective elevated deck.
Design Method 2B: Simple Slab Retrofit Drain
When a second floor drain is retrofit into this type of construction, the drain and the perimeter of the cut should be waterproofed with the swell stop material at roughly mid grade. The drain should still have weep holes.
Start by drilling a small hole where the drain should be located. Locate the hole below the slab to ensure the location will allow for the p-trap, piping, and that it will not interfere with any structural beams or equipment below. Never remove any portion of a structural member to install a drain.
Assuming the location is appropriate, the slab can be cut. There will be water running at this location at the end of the cut. Be sure to protect sensitive equipment below this location. Also, prepare for a heavy slab of concrete to fall below. A proper support needs to be in place to catch this slab of concrete. A man lift is often elevated to the bottom of the slab so that the slab can be safely lowered after cutting.
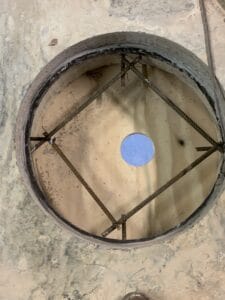
The drain must be properly doweled to the existing structural slab to ensure movement of the drain does not happen.
This is best accomplished by doweling old to new. A simple reinforcing cage around the drain spreads the load to ensure pressure is distributed on all dowels evenly. Dowels should be epoxied with an epoxy anchoring material similar to Hilti HIT500.
The ceiling of the floor below must be formed and braced to take the weight of the fresh concrete until it can properly set. The form work below should not be removed until proper cure of the concrete has taken place (preferably 7 days but will vary with concrete mix design). Also, the newly constructed drains should not receive vehicular or forklift traffic until the concrete has reached sufficient strength. Typically this is 2 weeks for standard concrete but can be sped up with proper mix design. Note that the reinforcing bar size should be determined by the load. Typically, on a second floor application only smaller forklifts are utilized and a #4 reinforcing bar is sufficient. Consult a structural engineer if you are unsure of the reinforcing that should be used.